Zeller POS Lite FAQs
Zeller POS Lite is a free, all-in-one point-of-sale system that manages sales, items, discounts, payments, and receipts. Zeller POS Lite is a perfect mobile POS solution for cafés, retail stores, food trucks, and market stalls, offering a reliable, easy-to-use POS system without unnecessary complexity or recurring monthly subscription fees.

Frequently asked questions
Zeller POS Lite is available on the Zeller Terminal 2, Zeller Terminal 1x, and from your smartphone when using Tap to Pay with Zeller App.
Zeller POS Lite is free and is available to use with Zeller Terminal 2, Zeller Terminal 1x and Zeller App. There are no lock-in contracts, setup fees, or monthly charges to use Zeller POS Lite. You can purchase both the Zeller Terminal 1x, Zeller Terminal 2 for $199 AUD to get started, or download Zeller App from the Apple App Store Google Play store. You’ll benefit from a low, flat transaction fee for all card types (including American Express) when accepting credit or debit card payments, or you can enable surcharging to pass the transaction fee on to your customers. If you’re using Zeller POS Lite to accept cash payments from customers, no transaction fees apply.
To get started, simply purchase Zeller Terminal 2 from the Zeller online shop and follow the steps:
If you are new to Zeller, create your free Zeller Account by signing up online.
Unbox your Zeller Terminal 2, connect it to Wi-Fi or insert Zeller SIM.
Sign in to your Zeller Account directly on the terminal, on Zeller Dashboard, or on Zeller App.
Access Zeller POS Lite through the ‘Mode’ icon in the top right-hand corner of the terminal screen, or in the navigation menu on Zeller Dashboard or Zeller App.
Start creating your item library by:
Add items into Zeller POS Lite directly on the terminal, Zeller Dashboard, or App.
Import items with a CSV list via the ‘Items’ tab on Zeller Dashboard. Learn more.
Manage your item library by adding details such as descriptions, images, and prices, and assigning them to specific sites if necessary.
Create categories to help organise your item library, such as ‘Food’, ‘Clothing’ or ‘Bakery’.
Create Attribute Sets to apply product variations to your items, such as size or colour.
Create Modifier Sets to apply options like alternative milk or gift wrapping to your items.
Create percentage or value-based discounts that can be applied at checkout.
Add items or categories to your Favourites for quick selection at checkout.
Add Service Charges by percentage or fixed amount and assign to specific sites.
For more help, contact Zeller Support for detailed assistance.
Attribute Sets are designed to simplify the process of selling products with slight variations (for example, different sizes, colours, flavours etc.) without having to create individual items to accommodate each variation. For example, a retailer that offers T-shirts in a variety of sizes might create an Attribute Set called “Sizes” in which they could include the variations “Small”, “Medium”, “Large”, and “Extra Large”. Once the “Sizes” attribute set is assigned to an individual item, you will then be able to select the particular size option when processing a sale. Attribute Sets allow you to create consistent product variations across your inventory.
Modifier Sets allow you to add customisable options to items. You can offer add-ons to your items at checkout, further enhancing customer service. For a cafe business, Modifier Sets might be “Alternative Milk” with options such as skinny, soy, oat, almond etc. For a retail business, “Gift Wrapping” or “Home Delivery” might be examples of useful modifier sets. When the modifier set is assigned to an item, these options will be available to select when checking out that item.
Modifier Sets can be created on Zeller App, Zeller Dashboard, or directly from Zeller Terminal 2.
How to create a Modifier Set
How to manage a Modifier Set
How to assign Modifier Sets to items
Favourites are items or categories that you choose to appear on your Zeller POS Lite home screen on Zeller Terminal 2 or Zeller App to help you select them quickly, to save time when processing sales. Favourites are device-specific, so if you are using more than one Zeller Terminal in your business, you will need to select favourites for each individual device.
The item import feature is a useful and time-saving option for businesses that already have a list of items prepared, or for those that are migrating from another point-of-sale system. Via Zeller Dashboard, businesses can simply upload their item lists as a CSV file, and they will automatically populate into Zeller POS Lite. To ensure there are no issues when importing items, we recommend downloading the CSV file template from the Items tab within your Zeller Dashboard (click All Items > Manage > Import Items > Download Item File Template).
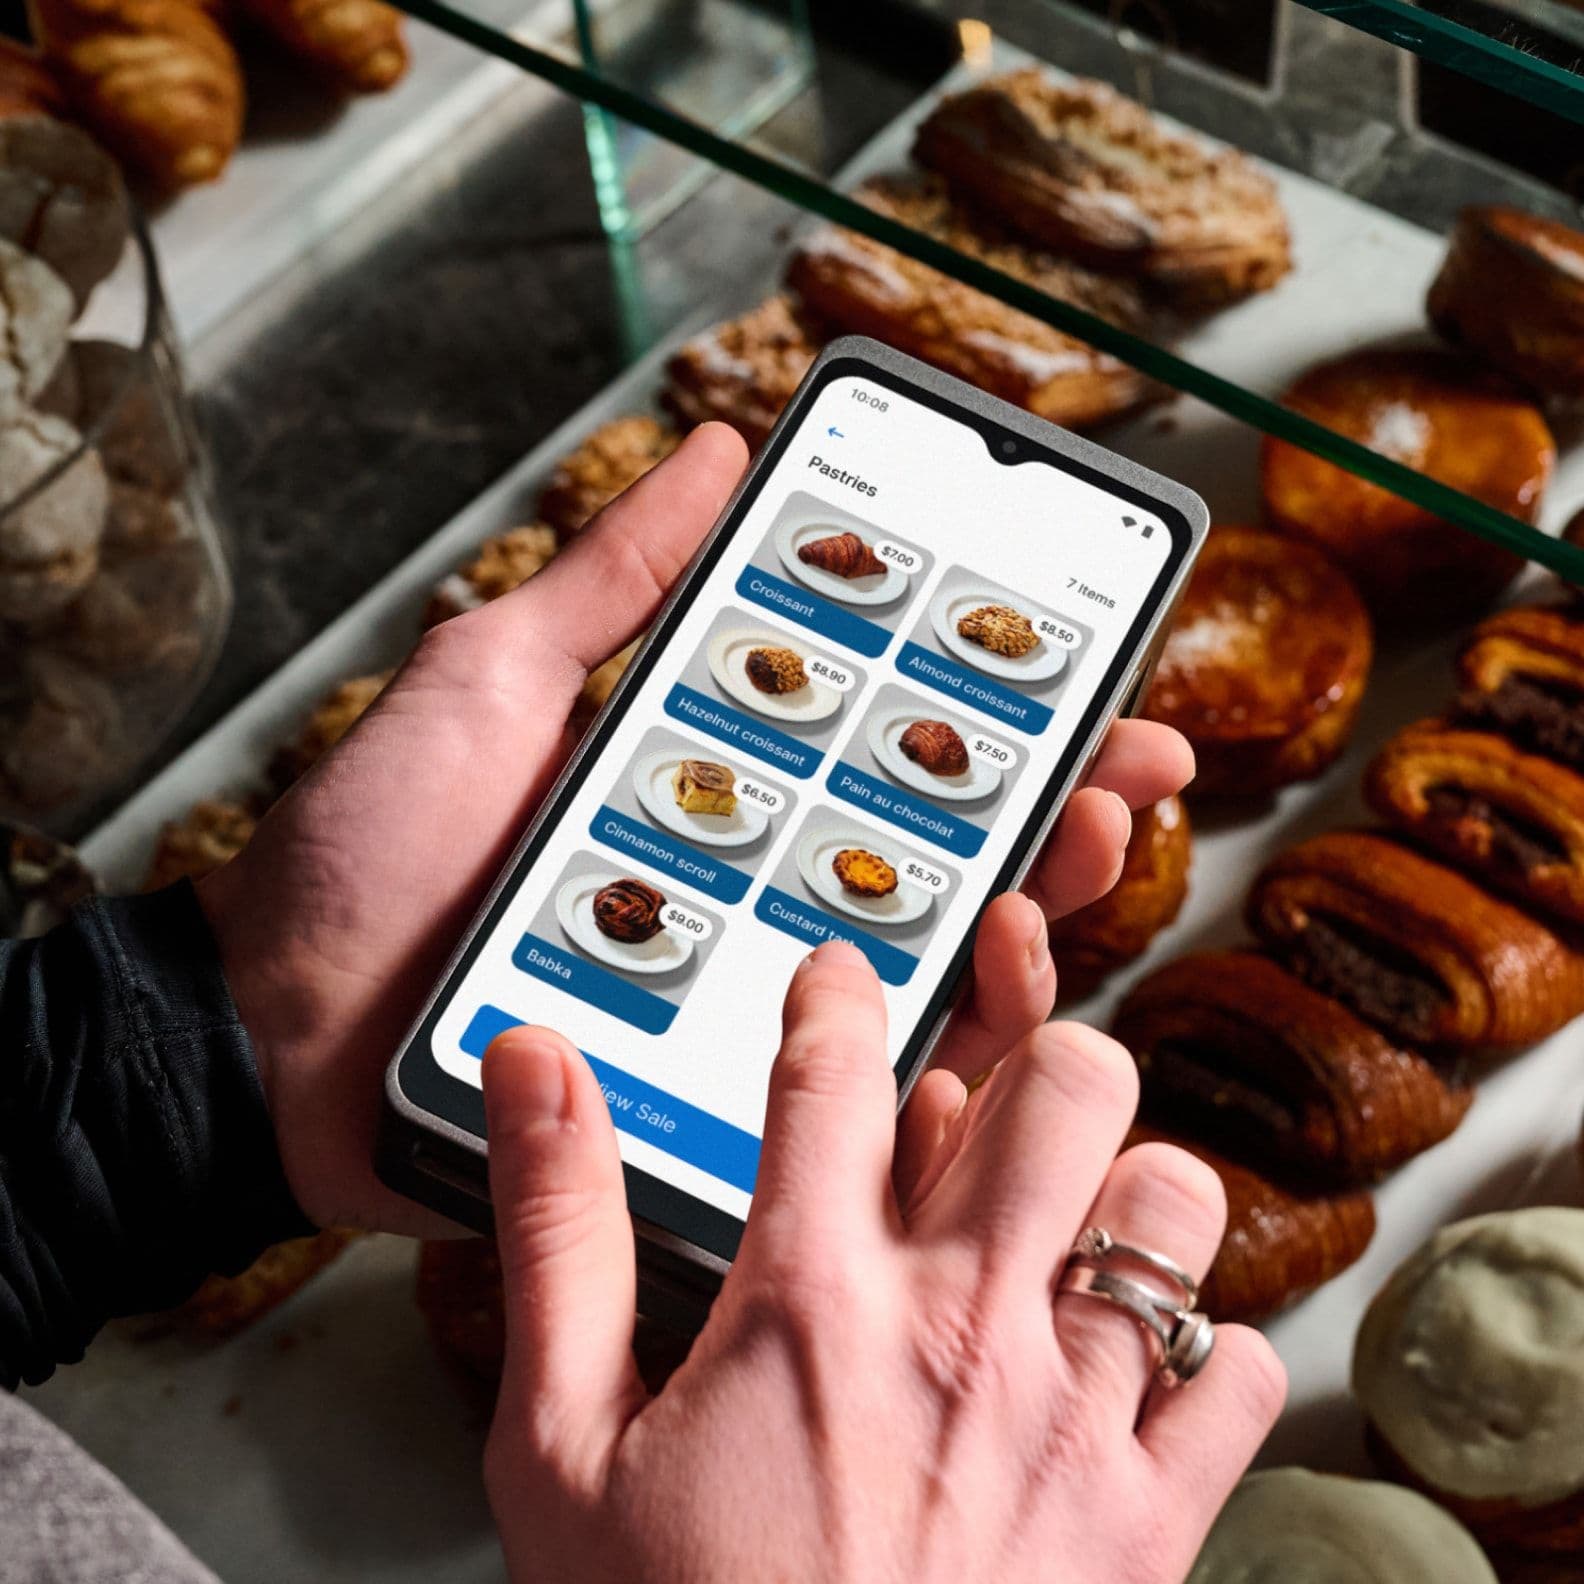
To process a sale, start by logging into your Zeller Account on your Zeller Terminal 2 [or on Zeller App], and follow the steps below:
Navigate to Take Payment.
Tap MODE on the top right of the screen and select POS Lite.
Locate the desired item on the Home or Favourites screen.
Select the item and tap Add to the sale.
To adjust quantity: Tap the plus or minus icons at the bottom of the screen before adding to cart.
Tap the cart icon at the bottom of the screen.
To remove an item: swipe an item row from right to left and tap the delete icon.
To discard the entire sale: tap the 3 dots in the top right-hand corner of the sale screen and select Discard Sale.
To edit items: tap the item you wish to manage and select View/Edit Item Details to adjust quantity or change variants or modifiers.
Tap Charge or Next, if the tipping prompt is enabled.
Advise the customer to tap their card on the contactless logo.